How to Insert a Screenshot in Excel 2013
If you are an avid user of Excel 2013, you have probably run into situations where you need to insert screenshots into your workbook. Unfortunately, most people don’t know that Excel 2013 comes with a purpose-built feature that makes it much easier to add screenshots to your workbook. Learning how to insert a screenshot in Excel 2013 will help save you a lot of time, so keep reading this tutorial if you want to master this useful skill.
Step 1: Launch Excel 2013
Step 2: Open a workbook in which you wish to insert a screenshot
Step 3: Click on the Insert tab
Step 4: In the Illustrations section, click on the small Take a Screenshot button
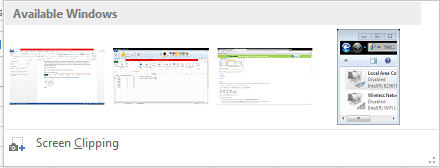
Step 5: in the dialogue box that opens up, you can choose to capture and insert a screenshot of any open window you have.
Step 6: You can also select Screen Clipping to add a screenshot of only part of a window. Once you select Screen Clipping from the Insert a Screenshot dialogue box, simply drag out and select whatever part of the screen you wish to clip. If you have multiple screenshot windows open, make sure you select the window you want to clip for your screenshot before you click on Screen Clipping


