How to Customize a Slideshow Using Slide Master in PowerPoint 2013
A slide master is a slide that contains formatting and theme related information about all the slides in your slideshow. All presentations contain at least one slide master. If you learn how to customize a slideshow using Slide Master in PowerPoint 2013, you might save yourself a lot of time. Instead of having to make changes to all your slides individually, you can simply use this powerful tool . In this tutorial, we will teach you how to customize a slideshow using Slide Master in PowerPoint 2013.
Step 1: Launch PowerPoint 2013
Step 2: Open a presentation in which you wish to customize Slide Master
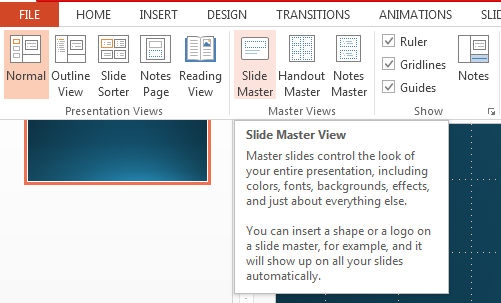
Step 3: Click on the View tab
![]()
Step 4: In the Presentation Views group, click Slide Master

Step 5: A blank slide with default layout will open. The slide that is left-aligned (the one which is not indented) is the Slide Master.

Step 6: Any formatting changes you make will be applied to all slides in the presentation. For instance, if you insert a shape on to the Slide Master, it will appear on all slides in the presentation
Step 7: You can add additional Slide Master slides by clicking on the Slide Master tab and then clicking Insert Slide Master in the Edit Master section

Step 8: At any time, you can click on the Close Master View in the Close section of the Slide Master tab to go back to normal view without Slide Master


