The MiniBar or Mini Toolbar in MS Word 2010
Another feature in Word 2010 is the MiniBar, more formally known as the Mini Toolbar. The MiniBar is a set of formatting tools that appears when you first select text. It is not context-sensitive, and always contains an identical set of formatting tools. There is no MiniBar for graphics and other non-text objects.
When you first select text, the MiniBar appears as a ghostly apparition. When you move the mouse pointer closer to it, it becomes more solid, as shown in Figure 1-13. If you move the mouse pointer far enough away from it, it fades away completely.
Note
Once the MiniBar disappears, you cannot resurrect it by hovering the mouse over the selection. You can, however, display the MiniBar and the current context-sensitive pop-up menu by right-clicking the selection.
Note also that only the mouse triggers the MiniBar. If you display the pop-up context menu by pressing Shift+F10 or by tapping the Menu button on a Windows keyboard, the MiniBar will not appear.
The MiniBar appears when text is first selected
Some users will love the MiniBar, others will hate it. I recommend that you give it a try. It exists to provide convenient and discoverable access to commands that are otherwise less convenient and less accessible, unless you are an avid keyboarder.
When the Home ribbon is exposed, the MiniBar might seem superfluous, as all of the MiniBar’s components are replicated in that ribbon. However, consider for a moment how far the mouse has to travel to access those formatting commands. With the MiniBar, the mouse pointer usually has to travel less than an inch or so. For those with repetitive motion injuries, this can save a lot of wear and tear on the wrist.
If you decide that the MiniBar gets in the way, you can turn it off. Even when it is turned off, however, you can still summon it by right-clicking the current selection.
Note
Unlike many ribbon tools, the MiniBar tools do not produce live previews of formatting and other effects. If you need to see a live preview, use the ribbon instead.
Context Menus
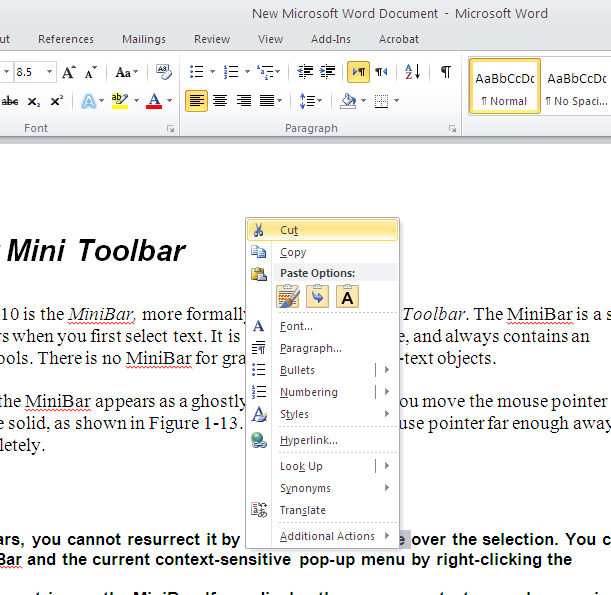
While the menu system of Word 2003 and earlier has been almost entirely replaced by ribbons, Word’s context menus, often called pop-up menus, remain. Shown in Figure 1-14, context menus remain largely unchanged from Word 2003, except for the fact that when text is selected, the MiniBar accompanies the pop-up.
Note
While context menus remain in Word 2010, the ability to customize them is gone.
FIGURE 1-14
When you right-click a selection, a context-sensitive pop-up menu appears, along with the MiniBar.
Super Tooltips
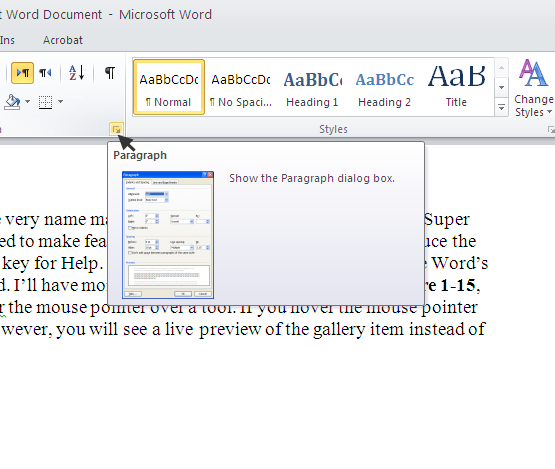
Another Word 2010 feature is super tooltips. The very name makes you want to leap over tall buildings! Super tooltips are expanded feature descriptions designed to make features more discoverable, as well as to reduce the frequency with which you’ll need to press the F1 key for Help. (As it turns out, this is a blessing, because Word’s Help system isn’t exactly what the doctor ordered. I’ll have more to say about that later.) Shown in Figure 1-15, a super tooltip magically appears when you hover the mouse pointer over a tool. If you hover the mouse pointer over an exposed gallery item (such as a style), however, you will see a live preview of the gallery item instead of a super tooltip. Even better!
Figure 1-15
Super tooltips explain the selected feature, reducing the need to press F1. Super ToolTip
Dialog Boxes and Launchers
Even though Office 2010’s philosophy focuses on the results-oriented ribbon, some features and functions emain tied to traditional dialog boxes. Dialog boxes can be launched in several ways, including by direct keystrokes and what Microsoft calls launchers. Launchers are the arrows pointing southeast in the lower right corner of some ribbon groups, as shown in Figure 1-16.
Clicking a launcher displays a dialog box.
Figure 1-16
In many instances, Word’s dialog boxes have not been overhauled or greatly enhanced for this release. However, if you look closely, you often will see a number of changes, some subtle and others not so subtle. Figure 1-17 contrasts the Font dialog boxes from Word 2010 and Word 2007. Sometimes, if you look really closely, new features will leap out at you!
Task Panes
Word 2003 sported a collection of 14 task panes (or more, depending on what features were installed and in use). You activated the task pane by pressing Ctrl+F1, and it included Getting Started, Styles and Formatting, Clipboard, Mail Merge, and others. in Word 2010, Ctrl+F1 toggles the ribbon on and off.
Figure 1-17
If Ctrl+F1 is now used for something else, how do you activate the task panes in Word 2010? The short answer is that task panes, as a cohesive concept, have been mostly abandoned. Word 2010 still has some task panes, but you can’t access them using a drop-down menu as you could in Word 2003, and you can’t access the entire collection of task panes using a single keystroke.
Instead, they will appear as needed (and possibly when you aren’t expecting them). Think of them as dialog boxes that enable you to type while they’re onscreen. In the Home ribbon, click the Styles dialog launcher. This displays the Styles task pane. Now click the drop-down arrow to the left of the X in the upper right corner of the task pane, as shown in Figure 1-18. Instead of a list of task panes, you get three options that control only this task pane. Task panes can be docked on the left or right side of the document window, or can be dragged and isplayed wherever it’s convenient — including completely out of Word’s window frame. Just move the mouse pointer over the Styles title bar and drag. To return it, just drag it back, or double-click the floating task pane’s title bar.
Note
Is there something missing from the Styles task pane? In Word 2003, the Styles and Formatting task pane always shows the style of the current selection. That doesn’t always happen in Word 2010, because the Style gallery is limited in the number of styles it can display and it doesn’t automatically scroll to the currently selected style. If this is a problem for you, there is a partial solution. See Chapter 9 for the details.
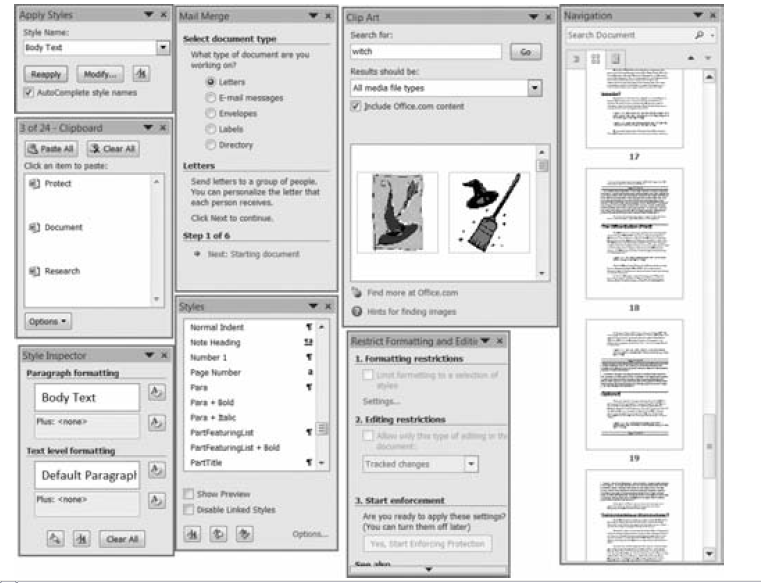
Other Word 2010 features that manifest as independent task panes include the Navigation pane (new in Word 2010), the Mail Merge Wizard, Clip Art, Protect Document, Research, Document Management, the Clipboard, and the Style Inspector. While it might seem a bit odd for Microsoft to have unbundled the task panes, a quick look at Figure 1-19 hints at a decided advantage of the independent approach. While you probably won’t need to have them all onscreen at once, it’s nice to know that you’re not limited to just one task pane at a time.
You can display multiple task panes at the same time, should you feel a compelling need for clutter.
Figure 1-19


