Multi-Stroke Key Assignment in Word 2010
Ordinarily, most users think about keystrokes in terms of Ctrl+S, Alt+B, Shift+F5, and so on. Word does enable you to create these kinds of shortcuts, but you can also create another kind, such as Ctrl+S,1 or Ctrl+T,Z. For these assignments, you would press the initial keystroke, such as Ctrl+S, and then (after releasing the Ctrl and S keys) you would type an additional character, such as a 1.
Why would you want to do this? You might want to do this because it greatly expands the number of shortcut keys you can create for any given Ctrl, Alt, Shift + key combination. It also lets you do so in a logical and methodical way. For example, by default, Headings 1 through 3 are assigned to Ctrl+Alt+1 through 3. For some of us, that’s not exactly an easy combination to press with one hand. Moreover, what about Heading 4 through 9? Many people use those styles as well.
What if, instead of those three difficult-to-press assignments, you could instead press Ctrl+Shift+X followed by 1 through 9? (By default, Ctrl+Shift+X toggles XML tags, so if you’re not an XMLer, this might work for you.) That then gives you the much easier Ctrl+Shift+X to press, and easy-to-remember 1 through 9 for the respective heading styles.
Or, suppose you frequently work with mail merge. Very few of the Mailings ribbon tools have built-in key assignments. You might consider assigning Ctrl+M,S to Select Recipients, Ctrl+M,E to Edit Recipients List, and so on.
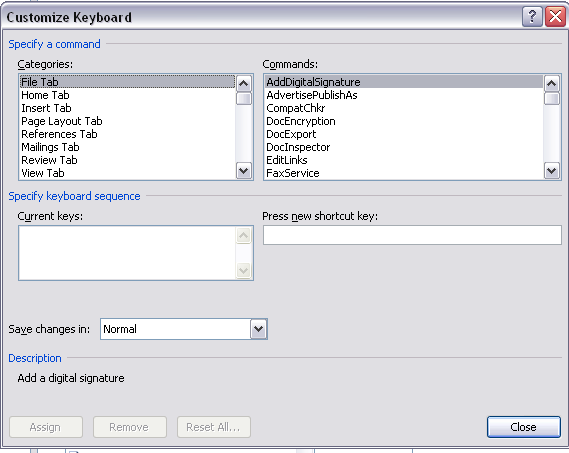
To create a multi-stroke assignment, in the Press new shortcut key field (refer to Figure 45-1 or Figure 45-2), press the first combination, release the keys, and then tap the next key. The assignments will appear as Ctrl+M,S and Ctrl+M,E, just as shown here. Click Assign, and you’re off and running.
Word Options Method
Having covered the basics and the cloverleaf method, let’s look at the normal method. Though the cloverleaf method is great when it works, it doesn’t always work. Some commands aren’t available in any of the ribbons and don’t have default assignments. Other commands are available only indirectly (for example, from inside a dialog box) and hence aren’t accessible to the cloverleaf method. When the quick cloverleaf method isn’t available or otherwise doesn’t work, use the Word Options method — and even it can be assigned to a shortcut, so it doesn’t have to be much more onerous than the cloverleaf method. From it, you can assign just about any key to just about any command. (Hold that just about thought for a moment.)
Choose File ➪ Options ➪ Customize Ribbon ➪ Customize (at the bottom of the dialog box).
Referring back to Figure 45-1, notice that the Categories field has only All Commands showing, and grayed out. The Commands list shows only a single command. That’s because we got there using a back road. When you go there using the main road, however, all options are available, as shown in Figure 45-2. Not to overplay the routing metaphor, but you can get to the full-service Customize Keyboard dialog box using a shortcut — just not using the built-in cloverleaf shortcut shown previously. Instead, you can assign Customize Keyboard to a shortcut key of its own, as shown in Figure 45-2. That way, the full-service Customize Keyboard is just a keystroke away, like the single-command cloverleaf version.
Note
Two paragraphs earlier, I said you can assign just about any key to just about any command. Why ‘‘just about any’’ rather than ‘‘any’’? Because Word doesn’t want you to shoot yourself in the foot. For example, suppose Word were to let you assign the ‘‘e’’ key to a command. That might cause problems. You likely need the ‘‘e’’ key for typing things like ‘‘Help!’’ So, you can’t reassign the ‘‘e’’ key here. Moreover, the
Tab key is used as a navigation key within the dialog box itself, so if you press Tab while in the Press new shortcut key box, the focus is shifted to Save changes in. Therefore, that tab key is taboo, at least in the
Customize Keyboard dialog box. Other keys, such as Enter, F1, Shift+Enter, and Esc are also off-limits in the Customize Keyboard dialog box, so if you need to assign the off-limits keys, you’ll need to do so using VBA (Visual Basic for Applications, the language used for recording and writing Word macros).
While it seems almost blasphemous to assign a toolbar shortcut for a way to create shortcut key assignments, you can put the Customize Keyboard tool onto the Quick Access Toolbar.
Right-click the QAT and choose Customize Quick Access Toolbar.
Set Choose Commands From to All Commands. Click in the long list of commands and tap the D key to zoom to just below the end of the list of commands that start with C. Six commands up from the first D command, click Customize Keyboard, and then click Add to put it into the QAT list. Click OK and you’re done.
Now that you can travel at high speed to the Customize Keyboard dialog box anytime you want, the rest of this chapter should be a breeze. Just keep your seatbelt fastened, and your eyes on the road.


