How to start Word 2010
Starting Word
Mercifully, some aspects of Word seldom change, and the way in which you start Word is one of them. This book assumes that you’re using Windows 7 in its default configuration, although for many readers that may be a bad assumption. I trust, however, that if you know enough about how to make Windows 7 look and act like Windows Vista or XP, you’ll be able to translate what is said into the steps that apply in your situation.
Start Menu
One of the more common ways of starting Word — but not necessarily the most common — is through the Start menu. To do this, you choose Start ➪ Programs or All Programs ➪ Microsoft Office ➪ Microsoft Word 2010.
Perhaps easier for Vista and Windows 7, you can choose Start, and then type word into the search box. When Microsoft Word 2010 is highlighted under Programs in the results list, press Enter.
Note
If you installed Word 2010 and chose to leave any earlier versions of Word on your computer, you will need to be mindful of which version you are starting. When Word 2010 is installed after earlier versions, the most recently installed version of Word now assumes ‘‘ownership’’ of the .doc, .docx, .docm, and similar file types, as well as other file types previously associated with the earlier versions of Word.
Alternatively, if you’ve recently been working on a Word document, you can start Word by right-clicking Word in the taskbar, and clicking the desired document name in Windows 7’s ‘‘jump list’’ (assuming it is still listed).
Desktop
Word can also be started from a Windows shortcut placed on the desktop. The easiest but least flexible way to do this is to copy an existing shortcut from the Microsoft Office folder created during Office’s/Word’s installation. To do this, choose Start ➪ Programs or All Programs ➪Microsoft Office. Right-click the icon for Microsoft Word 2010 and choose Send To ➪ Desktop (create shortcut). Click the desktop icon on the Windows taskbar to display the Windows desktop, and locate the Microsoft Word 2010 shortcut.
Tip
To quickly move to a particular shortcut on the desktop, display the desktop, click anywhere on it, and tap the first character of the shortcut’s name. Repeatedly tapping that key cycles among all shortcuts that begin with that character. In this case, it would be M. Do you have a dozen or more shortcuts on your desktop that all begin with the word Microsoft? This negates the utility of the tip, right? Well, there’s no reason all Microsoft shortcut names have to start with the same letter. Rename them. For example, rename Microsoft Word 2010 to just Word 2010 (or just Word, if that’s the only version installed). Word!
To do this, select the shortcut and press the F2 key. Replace the highlighted text with just Word or Word 2010 (or Word 14), and then press enter to exit the editing mode. Now when you click on the desktop and tap the W key, it will likely take many fewer taps to find Word than when it was just one of a dozen or more items that began with the letter M. Do this for Excel, PowerPoint, Outlook, and so on as well.
Creating a Full-Function Word Shortcut
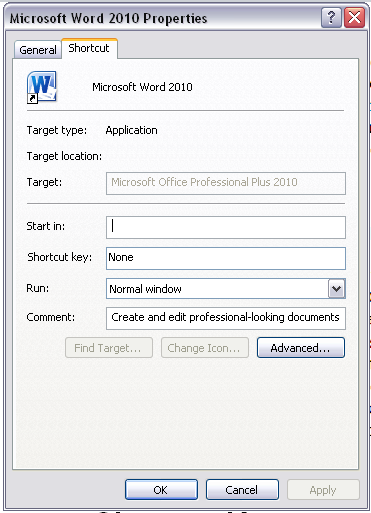
The previous section mentioned that using the shortcut created during Office/Word installation was the easiest but least flexible method for opening word. It lacks flexibility because of the nature of the special shortcuts created by the Office installation program. Find the Word 2010 shortcut you created or copied on the desktop, right-click it, and choose Properties. In the Shortcut tab (see Figure 2-1), you’ll see that the Find Target and Change Icon controls are grayed out.
If you want to modify the target to add a command-line switch (see ‘‘Command-Line Switches’’ later in this chapter), this shortcut won’t work. Similarly, if you want to differentiate between Word shortcuts by assigning different icons, this shortcut won’t work.
While this shortcut is fine for starting Word or even assigning a shortcut key, it is not sufficiently flexible for some needs. To create a more functional shortcut you’d need to find the actual program (winword.exe) that’s used to start Word 2010. Press esc to close the Properties box.
FIGURE 2-1: Shortcuts created by Office’s installation program have Target fields and icons that cannot be modified by the user.
While locations vary (depending on user and network settings, for example), the usual default location for Word 2010 is C:\Program Files\Microsoft Office\Office14\winword.exe.
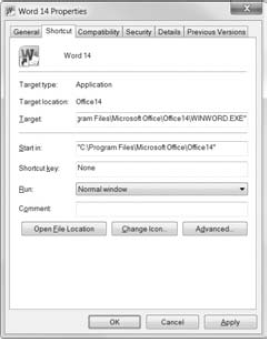
Open Windows Explorer and navigate to winword.exe. When you find it, right-click it and choose Send To ➪ Desktop (create shortcut). On the desktop, locate WINWORD.EXE – Shortcut, right-click it, and choose Properties. As shown in Figure 2-2, the Target field is no longer grayed out, and the Change Icon button is now available, which enables you to customize the target specification as well as choose a new icon for this shortcut.
With the flexible shortcut you can now add command-line switches to the target as well as choose your own icon. When and if needed, the Compatibility tab is now also available. You probably want to change the shortcut’s name while you’re at it.
Shortcut Key
Once you’ve identified a Windows shortcut you can use to open Word, you can also assign a shortcut key to it. To assign a shortcut key, click the Shortcut key field (shown in Figure 2-2) and press the key combination you want to use. I find that Ctrl+Alt+Shift combinations seldom are used by other programs, and therefore usually are available. Personally, I use Ctrl+Alt+Shift+W for Word, Ctrl+Alt+Shift+E for Excel, and Ctrl+Alt+Shift+P for PowerPoint.
FIGURE 2-2: User-created shortcuts have targets and icons that are accessible.
Pinning to Taskbar
Another startup option — one I highly recommend — is to place a shortcut onto Windows’ taskbar. Always visible and highly flexible, the taskbar is a vast ergonomic improvement over the rarely visible desktop (rarely visible at least on my computer) as well as over various Start menu approaches. If you need to modify a shortcut that’s pinned to the taskbar, it’s a two-step process. Right-click the shortcut to display the jump list. Just above the Unpin option, right-click Word 2010, and choose Properties.
Caution
Attention Vista users: if you want to also be able to assign a keystroke to the shortcut, make sure you assign it to a shortcut that’s on the desktop and not one that’s already on the Quick Launch. Because of a bug in Windows Vista, shortcut keystrokes assigned to Quick Launch shortcuts usually don’t work. When assigned to a desktop shortcut and later moved to the Quick Launch, they work fine. This is not an issue in Windows 7 (unless you’ve chosen to resurrect Quick Launch, in which case you’re on your own).


