Another Ways To Start Word2010
Another way to start Word is by double-clicking a Word-associated document displayed in Windows Explorer. Simply open Windows Explorer, navigate to the desired document, and double-click it. Alternatively, you can select it and press Enter, or right-click it and choose Open.
Tip
In fact, you can open multiple Word files this way — at the same time. Select the first one you want to open, and then Ctrl+click on each additional file you want to open. Then press Enter. This also works in Word’s own Open dialog box.
Browser
Usually you can also open Word by clicking a Word document link that’s displayed in a browser window. Simply click the link. Unfortunately, there are a couple of reasons that this is a bad idea. For starters, you often don’t know how large the file is or how fast the server is. Uninformed clicking sometimes ties up not only your browser but Word as well, resulting in a possibly misleading ‘‘Word is not responding’’ error message. Even more importantly, however, unless you yourself put the file onto the server, you can’t be sure it doesn’t contain
a virus. A better approach almost always is to right-click the document link in question, choose Save Target As (or your browser’s equivalent), and save the file to a local folder. While most popular antivirus programs monitor files you open from links, I’m not positive this is true of all of them, and I am positive that not all macro viruses have been discovered and incorporated in all antivirus programs. Better safe than sorry. After the file is on your hard drive, you can scan it with your antivirus program before proceeding.
Tip
Any time you open a Word file of uncertain origin, hold down the shift key as you open the file. This prevents any automatic macros from running. Inspect it for suspicious macros, and once you’re sure it’s safe, proceed — but cautiously. In theory, this is less necessary in Word 2010 than in previous versions of Word, however. When Word detects that a file has come from an outside source (Internet, e-mail attachment, etc.), it can open it in Protected View. At this writing, however, Protected View does not always work, so my best advice still is to use the shift key trick when opening foreign files.
Another reason to explicitly save the file is that it can be put somewhere other than in your temporary Internet files. That way, if you need it again later, you won’t have to download it again.
Windows Search Box
Another way to start Word from the Start menu is by using Windows’ Search programs and files box. This provides an easy way (easier than creating a new shortcut, for example) to run Word using command-line switches (discussed later in this chapter). Click the Start button and type word (or winword if you need additional parameters or switches) into the Search programs and files textbox, as shown in Figure 2-3. If you need to run
Word once with a special one-time command-line switch (coming up next), this is one way to do it. If you’ll need that particular command-line switch more often, then you’d be better off creating a Windows shortcut and tucking it away in a memorable location for future use.
FIGURE 2-3: Choose Start ➪ Run to startWord using a command-line switch.
Note
Under some circumstances, you might need to type the full path for Word into the Open box. The usual location is C:\Program Files\Microsoft Office\Office14, but it can be different depending on whether you’re running the 64-bit versions of Windows and/or Office.
Safe Mode
Any time you start Word, you have the option of starting it in safe mode. You might want to do this for a variety of reasons, including the following:
- Word experienced problems and you’re trying to diagnose them.
- You need to observe Word’s default behavior to help someone else.
- You need to suppress a Word add-in, for whatever reason.
- You’re curious about something (my own personal favorite),To start Word in safe mode, simply press the control key (either left or right) when you start Word, and continue holding it until the dialog box shown appears. Click Yes to continue starting in safe mode.
Hold down the control key to startWord in safe mode.
When you start in safe mode, a number of Word options and Windows registry settings are suppressed. Word add-ins are also not loaded, and user settings stored in Normal.dotm are not loaded either. The idea is to prevent user and other customizations from interfering with
Word’s default behavior. This can be useful in a variety of circumstances, from diagnosing problems to writing books and articles about Word in which you don’t want to confuse your own customizations with Word’s normal built-in defaults.
Note
Starting Word in safe mode is not the same as starting Word using the /a command-line switch. More on this later in this chapter.
Command-Line Switches
Command-line switches can be used to change the way Word opens, as well as to perform certain tasks. Depending on the permanency of the need for a given command-line setup, either Windows’ Search box, shown in the previous section, or a full-function Word shortcut should be used.
You can, of course, open a command prompt window and navigate DOS style, but for most users that’s a bit too tedious.
Note that all command-line switches require a space after the trailing quote that follows the file specification for the Word executable file, and before the backslash (\), e.g.,
winword.exe”[space]/a. There is no space, however, between the / and the character that follows it. Note also that when a file path specification or filename itself contains a space, the entire name must be enclosed in quotes.
Tip
Sometimes getting the command-line specifications right involves a fair amount of trial and error. To save time and effort, create a full-function Windows shortcut for starting Word. Open the Properties dialog box and make your change(s) to the Target field. Then, rather than close the Properties dialog box, click Apply. The dialog box remains open and the shortcut reflects the changes. If whatever you did didn’t work, go back to the Properties dialog box and try something else. Keep it open until you find something that works the way you want it to.
/a
The /a switch prevents Word from automatically loading global templates (including your version of normal.dotm) and add-ins. It also prevents Word from loading some of the settings in Word’s Data key in the registry. The /a switch often is used as a diagnostic tool for isolating problems with Word. Hence, if adding the /a switch ‘‘solves’’ whatever problem you’re having, then the problem is located in a global template or an add-in.
Note
Unlike Word 2003, the /a switch in Word 2010 does not suppress changes to the QAT. It also doesn’t prevent the display of files in the Recent Documents list when you click the File button.
Using the /a switch is not as drastic or complete as starting Word in safe mode, because add-ins and global templates can still be loaded manually when you use the /a switch. An interesting quirk about the /a switch is that sometimes running Word just once with it is enough to fix certain registry corruption problems. In contrast, starting Word in safe mode does not modify the registry.
/laddinname
This switch starts Word and immediately loads a specific Word add-in — for example, /l”c:\program files\stat\statpax.dll”.
/m
This switch prevents Word from running any AutoExec macros. This sometimes is used in troubleshooting as well as to prevent damage to documents from unexpected AutoExec macros.
/mcommandname
This switch starts Word and immediately runs the indicated command or macro name. For example, /mfile1 starts Word and immediately runs the File1 command, which tells Word to open the first file listed in the Recently Used Files list.
/n
This starts Word without opening a new blank document.
/pxslt
This switch starts Word and creates a new XML document based on the indicated XLT (extensible stylesheet language transformation) — for example, /p”c:\XML\formatted.xsl”.
/q
The /q (‘‘quiet’’) switch suppresses the display of the Word 2010 splash screen when Word starts. This also results in Word’s starting faster.
/r
The /r switch forces Word to rewrite the registry entries. This often is used to fix problems with corrupted registry entries. Only the registry entries are changed, and Word does not open.
/safe
This switch starts Word in safe mode. This is the same as starting Word while holding down the control key and then clicking Yes. The full specifications of what safe mode does in Word 2007 and 2010 are not available at this writing. They will be similar to those for Word 2003, however, which are available at
http://support.microsoft.com/kb/827706
/ttemplatename
This switch starts Word and creates a new document based on the indicated template — for example, /tBrochure.dot or /t”C:\Program Files\Microsoft Office XP\Templates\1033\Brochure.dot”.
/u
Watch out for this switch on April 1. It has no therapeutic value whatsoever, and merely preventsWord from loading. Why does it exist? Nobody seems to know. If you’re a system administrator,one supposes you could temporarily disable users’ ability to run Word using this switch.However, that’s pure speculation as to why Microsoft created this switch in the first place.
/w
This switch starts a new instance of Word with a new blank Document# window. The new document will not appear as an option in the View ➪ Switch Windows list of other open instances of Word.
path\filename
Specifying a path and filename causes Word to open that file. If the path is missing, the file must be located in Word’s default document folder. For example, to create a shortcut for Word to open a document named C:\Users\Herb\Documents\Resources.docx, I might use the following target specification: “C:\Program Files\Microsoft Office\OFFICE12\WINWORD.EXE” “C:\Users\Herb\Documents\Resource.docx”.
Note that both the program specification and the full path and name of the file are inside quotes.
File or Backstage View
One of the tasks most frequently performed in Microsoft Word is that of opening files. You’ll be happy to know that if you reflexively press Alt+F in Word 2010, the File or Backstage view opens. And, in Word 2010, it might properly be called the File menu (unlike in Word 2007), although the current vernacular wants to call it the Backstage view. In time, we’ll see whether this catches on. I think it’s unlikely, since ‘‘Backstage’’ isn’t mentioned in what you see in Word’s interface.
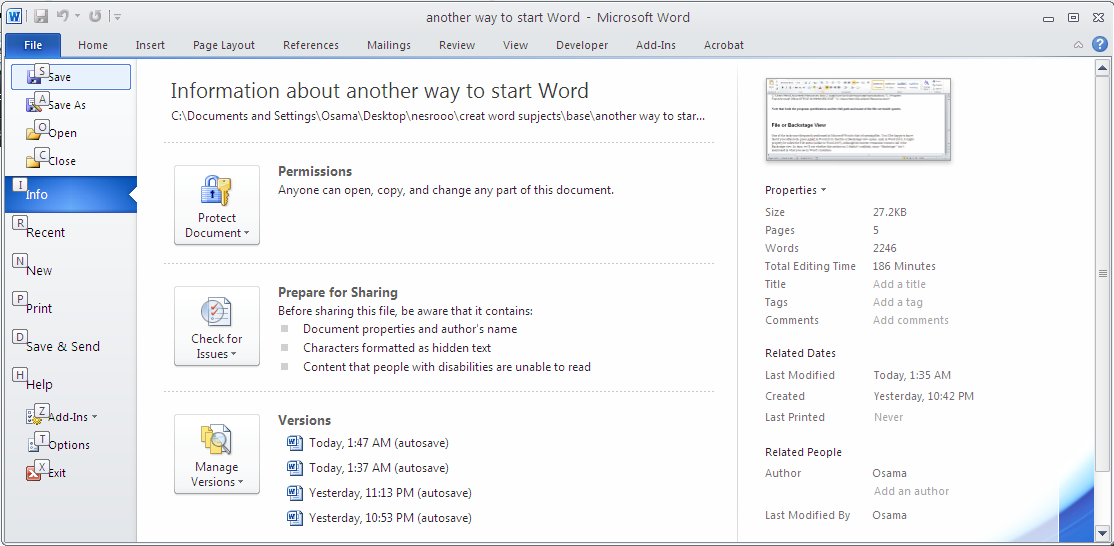
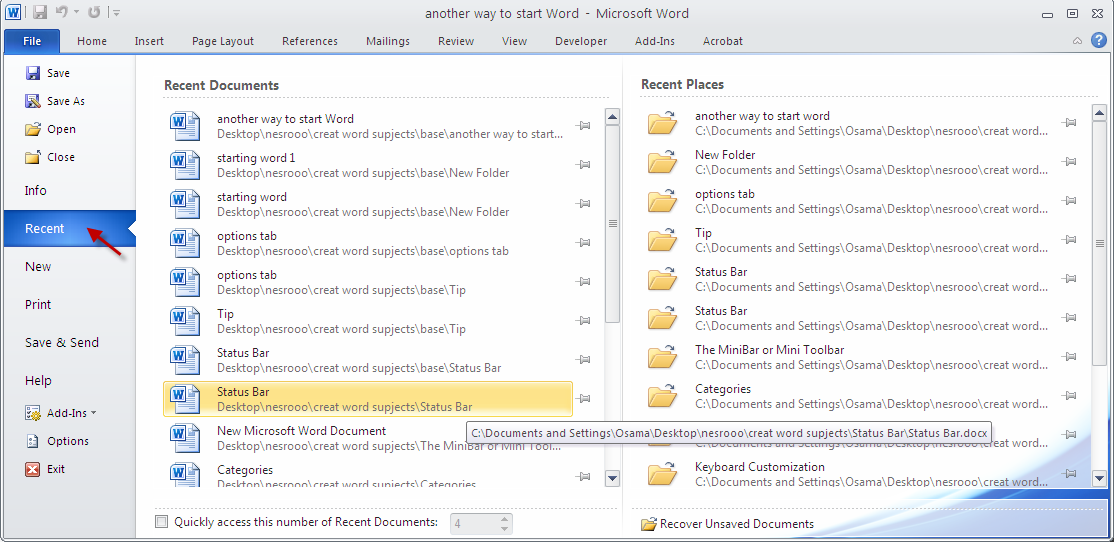
While Alt-F and the File tab both get you there, they do not have identical results. With no document onscreen, if you click the File button, you’ll get something like what is shown in Figure 2-6 in the following section. If you press Alt+F, you’ll get the slightly different view shown in Figure 2-5 (also in the following section), which displays the associated hot keys.
FIGURE 2-5: Pushpins are used to prevent files from being removed from the Recent Documents list.
Note
that the hot keys work regardless of whether the reminders you see in Figure 2-5 are displayed, so you don’t need to press Alt+F to get subsequent hot key functionality. (Above, I said ‘‘With no document onscreen’’ because if a document is open, Backstage opens to the Info tab instead of Recent Documents. It’s context-sensitive.)
Have You Been Pinned?
When you open Backstage view, notice the pushpins to the right of the top recent documents, shown in Figure 2-6 . When you click a pushpin, this tells Word not to let that file or folder cycle off of the Recent Documents or Recent Places list. It can cycle to the bottom (if all files have pushpins engaged), but as long as the pushpin is blue (pushed) and the number of pinned files in the list doesn’t exceed the maximum specified, the files won’t cycle off the list.
FIGURE 2-6: When you open the Office dialog box using Alt+F, its access keys are displayed.
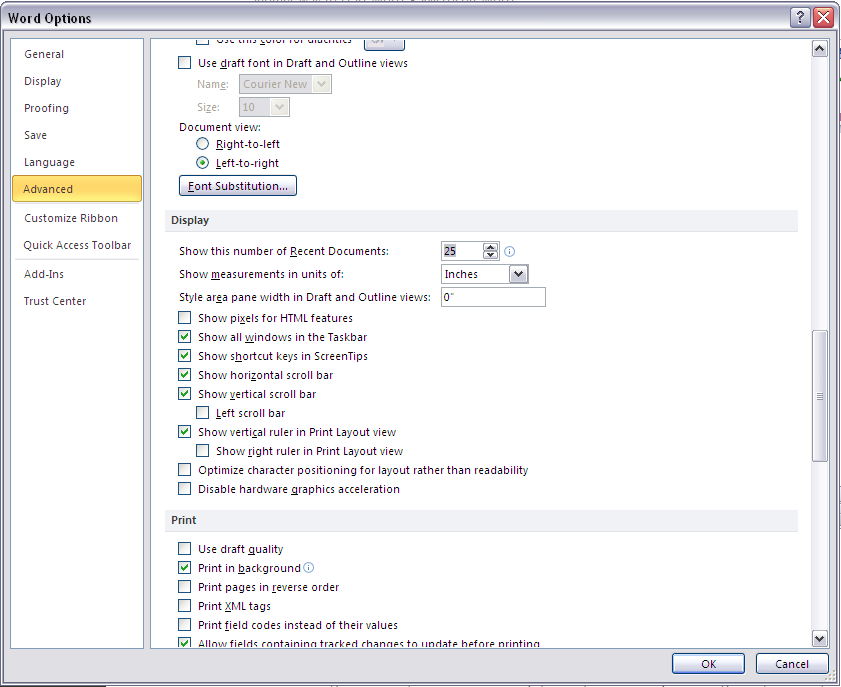
In Figure 2-5, the first two files’ pushpins have been pushed. Not shown here is that the maximum number of recent files to display is set at 20 (Options ➪ Advanced tab ➪ Display section). As new files are opened, the ones that are pinned will remain at the top of the list.
To clear the list of recent documents, set the maximum number of files to 0. If you subsequently reset it to a higher number, the list remains empty until you start to open files again. If, however,
you were to reset the maximum recent files to a lower nonzero number and then reset it to a higher number, the files previously displayed would reappear. So lowering the max is not a way to scrub files from the list, while setting the max to 0 is.
Notice also the Quickly access this number of Recent Documents option at the bottom of Figure 2-6. If checked, this adds that number of files selected to the leftmost part of the Backstage view — between Close and Info.


