How to Use the New Tilt-Shift Blur in Photoshop CS6
The third new Photoshop CS6 blur is the Tilt-Shift. With that you can add a linear shaped blur to any image at the same time having control over every single detail what is blurred or what is not.
Open a picture to add a blur on:

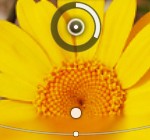
Go to Filter > Blur > Tilt-Shift. A new preview will open with 4 lines and a circle. From the circle you can move the blur around and adjust the strength of it. The lines you can drag up or down to adjust the blur distances and location.

From the small white dots you can rotate the blur according to your wishes and picture.

You can also add some distortion from the Tilt-Shift menu that makes the blurred area look more blurry ans smudgy. Press Ok to accept the changes.

And now you know how to successfully use the Tilt-Shift blur in Photoshop CS6.